Liquid Penetrant Examination
Jim Worman
Senior Staff Engineer
National Board
Category : Design/Fabrication
Summary: This article was originally published in the Winter 2011 National Board BULLETIN. (4 printed pages)
Learn more about liquid penetrant examination from our online training course — Go to our Business Center and open the Online Training Catalog under the Education Center tab. Liquid Penetrant Examination Basics is located under BOILER AND PRESSURE VESSEL / BPV ASME CONSTRUCTION.
Liquid penetrant examination is one of the most popular Nondestructive Examination (NDE) methods in the industry. It is economical, versatile, and requires minimal training when compared to other NDE methods. Liquid penetrant exams check for material flaws open to the surface by flowing very thin liquid into the flaw and then drawing the liquid out with a chalk-like developer. Welds are the most common item inspected, but plate, bars, pipes, castings, and forgings are also commonly inspected using liquid penetrant examination.
Over the years, liquid penetrant examination has been called many names: penetrant testing (PT), liquid penetrant testing (LP), and dye penetrant testing (DP). The American Society for Nondestructive Testing (ASNT) uses the name liquid penetrant testing (PT). The American Society of Mechanical Engineers Boiler and Pressure Vessel Code (ASME B & PVC) and the National Board Inspection Code (NBIC) use the name liquid penetrant examination (PT).
The first documented use of PT was in the railroad industry. Cast railroad wheels were dipped in used oil, dried off, and then coated with powder chalk or suspension of chalk in alcohol. Once the wheels were dry, any oil stored in the flaw would bleed out into the chalk and be detected. This was called the oil and whiting method.
The ASME Boiler & Pressure Vessel Code recognizes six different techniques of PT. They vary by type of penetrant and method of cleaning before applying a developer. The two penetrant types are either fluorescent or color contrast (dye) penetrant. They can then be used with any of the three methods of cleaning – water washable, post-emulsifying, and solvent removable. The most popular is dye penetrant that is solvent removable. This method is referenced throughout the article.
The dye penetrant solvent removable method is most popular because it is low cost and very versatile. It typically comes in three aerosol cans – cleaner, penetrant, and developer. The cans can be purchased from welding supply distributors for typically $5 to $15 a can. For less than $50 you can have all the equipment you need to conduct liquid penetrant examinations. The aerosol cans are very versatile which allow them to be taken up ladders, inside boilers, down into pits, and into very tight places. Most nonporous materials (steel, stainless steel, cast iron, aluminum, brass, bronze, titanium, rubber, plastics, and glass) can be examined using PT. Porous materials (concrete, wood, paper, cloth, and some types of fiberglass if the fibers are exposed to the surface) should not be examined using PT.
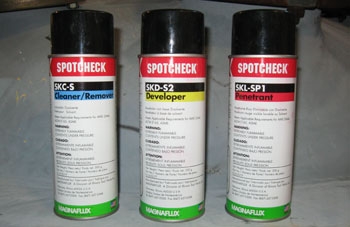
Dye penetrant solvent removable aerosol cans
There are several advantages and disadvantages to using liquid penetrant examination.
Advantages:
- High sensitivity to small surface discontinuities
- Easy inspection of parts with complex shapes
- Quick and inexpensive inspection of large areas and large volumes of parts/materials
- Few material limitations (metallic and nonmetallic, magnetic and nonmagnetic, and conductive and nonconductive can all be inspected)
- A visual representation of the flaw are indicated directly on the part surface
- Aerosol spray cans make the process portable, convenient, and inexpensive
- Indications can reveal relative size, shape, and depth of the flaw
- It is easy and requires minimal amount of training
Disadvantages:
- Detects flaws only open to the surface
- Materials with porous surfaces cannot be examined using this process
- Only clean, smooth surfaces can be inspected. (Rust, dirt, paint, oil and grease must be removed.)
- Metal smearing from power wire brushing, shot blasting, or grit blasting must be removed prior to liquid penetrant examination
- Examiner must have direct access to surface being examined
- Surface finish and roughness can affect examination sensitivity. (It may be necessary to grind surfaces before PT.)
- Multiple process steps must be performed and controlled
- Post cleaning of parts and material is required, especially if welding is to be performed
- Proper handling and disposal of chemicals is required
- Fumes can be hazardous and flammable without proper ventilation
It is important to remember penetrant is a very thin liquid designed to seep into the smallest crack. Consequently, if an assembly has stitch welds or material not sealed by a weld, the penetrant will travel behind the welds and between layers of unfused material. Penetrant can be nearly impossible to remove from these areas. Trapped penetrant will cause defects in welds if further welding is done or will bleed out over time and contaminate paint and process fluids.
For PT to be used on ASME Code construction or NBIC repair or alterations, a written procedure must be followed. This must comply with ASME Boiler and Pressure Vessel Code, Section V, Article 6, and address all essential and nonessential variables. Many liquid penetrant examinations are done for informational purposes only, and do not follow a written procedure. For instance, a written procedure does not need to be followed if a welder grinding out a weld crack for repair is using PT to ensure removal of the entire crack. However, if the PT is being done to comply with Code, the written procedure needs to be followed by qualified NDE personnel.
There are six basic steps to follow when using the dye penetrant solvent removable method.
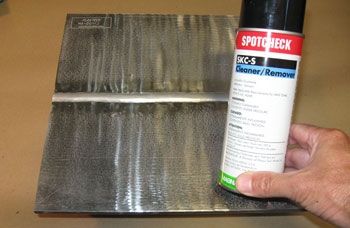
- Pre-clean part.
This can range from grinding and wire brushing to merely wiping the part with a rag moistened with the cleaner/ remover. The surface needs to be free of dirt, rust, scale, paint, oil, and grease, and be smooth enough to wipe off the penetrant without leaving residue.
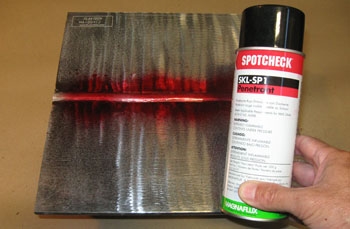
- Apply penetrant.
This is generally done by spraying penetrant from the aerosol can or applying it with a brush. A dwell (soak) time needs to be observed to allow for the penetrant to permeate into cracks and voids. This is typically 5 to 30 minutes but should never be long enough for the penetrant to dry. The penetrant manufacturer’s recommendations and written procedure should be followed.
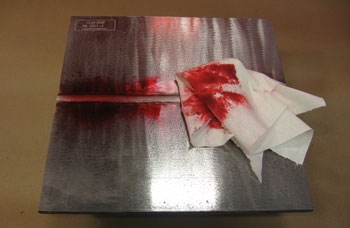
- Remove penetrant.
All penetrant should be removed with clean, dry, lint-free rags until thoroughly clean. The part or material should be rubbed vigorously until the penetrant is not visible on the dry rags. Next, cleaner/ remover should be sprayed on another clean, dry, lint-free rag and used to vigorously rub the part again until there is no penetrant visible on the rag.
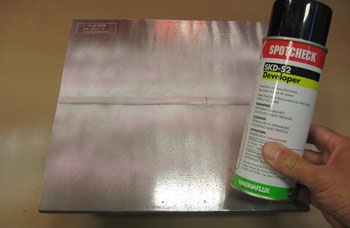
- Apply developer.
A thin, light coating of developer should be sprayed on the part being examined. A dwell time needs to be observed to allow time for the dye to exit the flaws and create an indication (flaw) in the developer. The dwell time for developer is typically 10 to 60 minutes. The developer manufacturer’s recommendations and written procedure should be followed closely.
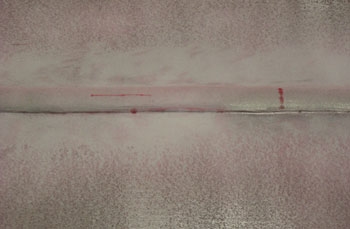
- Evaluate indications.
It is critical to examine the part within the time frame designated in the written procedure. Length of an indication can grow over time as penetrant bleeds out, causing an acceptable indication to be a rejectable defect. Length of indication is measured for evaluation, not length of the flaw. Here, the two linear indications are rejectable defects. The round indication is nonrelevant.
- Post-clean part.
The part needs to be cleaned to remove all developer after it has been evaluated.
ASME Section V also requires the dye penetrant solvent removable method be evaluated with a minimum light intensity of 100 foot candles on the part surface. Proper quantity of light must be verified using some type of light meter.
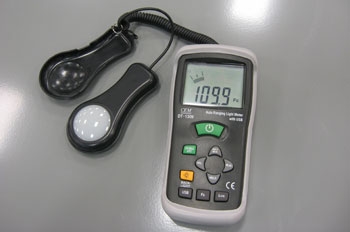
Light meter showing 109.9 footcandles of light
In the ASME B & PV Codes of Construction, magnetic particle examination or liquid penetrant examination is called out many times to detect the possibility of surface defects. If material is nonmagnetic the only choice is PT. Some typical examples of ASME Code required examinations include:
- castings for surface defects
- plates for laminations in corner joints when one plate’s edge is exposed and not fused into the weld joint
- head spin hole plug welds
- weld metal build-up on plates
- removal of defects before welding repair
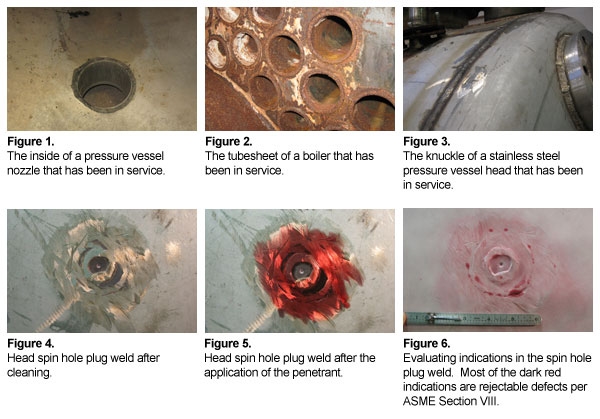
Once boilers and pressure vessels are in service, PT can be a very valuable tool. The NBIC recommends PT for examination of: firetube boiler tube sheets to find leakage around tubes, external inspection of weld joints, evaluating components subjected to fire damage, historical boilers, fiber-reinforced thermosetting plastic pressure equipment, Yankee dryers, and pressure vessels in liquefied petroleum gas (LPG) service.
During inservice inspections, PT should also be used in areas suspected of defects. These include, but are not limited to, nozzles (see Figure 1), tubesheets (see Figure 2), knuckles of heads (see Figure 3), and head spin hole plug welds (see Figure 4). To effectively use liquid penetrant on the tubesheet in Figure 2, an extensive amount of work would need to be done. All rust and scale would need to be removed so the penetrant could be cleaned off. Rolled, unfused tube ends would also bleed out dye and cause false indications. The head spin hole plug weld looks acceptable to the naked eyes, but shows many defects once it has been liquid penetrant examined (see Figures 5 and 6).
In conclusion, PT can be a very valuable tool during new construction and inservice inspections. PT does have limitations and is not the best method for all applications. However, for quick, low cost examinations in any location, PT is often the best choice of NDE methods.